Tuesday, 5 May 2015

Angel Greeting ATC Tutorial

Hello readers, thank you for stopping by :)  
I mentioned in my last post that I would describe how I made this Artist Trading Card:
I haven't made one of these mini cards before...but I knew I wanted to come up with a personal design that included an angel, a greeting and some techniques that I could replicate simply - in order for me to make a series of them to swap with other crafters :)  

I began with a piece of thick glossy photo card, 240gsm, measuring 6.5cm x 8.5cm.  I stamped part of a PaperArtsy Flora and Fauna image in clear embossing ink and sprinkled with clear embossing powder.  Having melted the powder from underneath with a heat tool, I then taped it inside a cardboard box. 
Next, I sprayed on some Cranberry Sorbet, Grape Juice and Candy Floss Inkadink inks. Using some kitchen towel I polished over the card and revealed the leaves stamp.  (You will notice some of this technique under the angel, this was a happy mistake as I previously attempted to heat emboss the angel, but the stencil image wasn't clear enough...I decided to keep some of the serendipitous result all the same!)  
I dismantled an angel from a spinning silver tea-light holder and used it as a stencil.  Using a piece of thick handmade paper, I inked through the angel using a square of cut and dry foam.  The inks I used are an Archival Brilliance pigment ink pad, Twilight.  I tore round the image and inked the edges with a hint of black and also some green tones from the Archival Brilliance pigment ink pad, Peacock.
Having attached the image with tape, I then moved on to the matting and layering.  I cut a piece of black card, 6.9cm x 8.9cm.  I drew a border with a VersaMarker watermark pen and scattered a mixture of Cosmic Shimmer Lapis Pearl Lustre embossing powder and Papermania Seafoam White embossing powder and heated.  For the back I cut out a piece of thick white card measuring 7.5cm x 9.3cm and attached the layers with tape.  
On the white background I drew a line of faux stitching with a very fine black pen and gently ran round the edges with the green inks. 
For the lettering I inked round some Tim Holtz Idea-ology 'Chitchat' stickers.

Thank you for taking the time to read this mini-tutorial.  
I hope you enjoyed your visit here :)

Angela x
Angel Greetings


Wednesday, 29 April 2015

What's On Your Workdesk Wednesday 308

A warm and sunny welcome to all :) 
It's desk-hop day yay! -where we share a fascinating glimpse into our creative workspaces.  Jump over to Julia Dunnit's blog for enlightenment of this inspiring activity...http://stamping-ground.blogspot.co.uk/ or, click on my WOYWW badge on the right->

Here's my desk...I've been getting messy experimenting with Inkadink's spray inks...
I tried a technique Inkadinks suggested; I took a piece of glossy card (I used glossy printer photo card, 180gsm) stamped an owl image in clear embossing ink and sprinkled with plenty of clear embossing powder.  I shook off the excess powder (-gets everywhere by the way!  Hence, the handy purple tidy tray in the top right corner) and heated the image from underneath the card using a 'heat it up' tool. (There's a real purple theme on my desk I've just noticed!) Then, I had a rare moment of being sensible and followed their advice to spray the inks in a cardboard box to avoid staining the surrounding area!  Needless to say I ignored the advice to don an apron..!  I taped down the card in the box and sprayed some Beany Green, Cranberry Sorbet and Grape Juice inks.  I was delighted when I rubbed over the inks with some kitchen towel and out popped the owl!  -I don't get out much, really..!

Also on my desk you may have spotted my first ATC (Artist Trading Card) design attempt for the ATC swap taking place on WOYWW 312.
I played with the inks on thicker photo card, 240gsm and discovered a different background effect (The purple rectangle mat):

I'll add a tutorial on how I made my first ATC in my next post :) as my energy's waning now...

Thank you very much indeed for visiting me today and special thanks for any messages left :)  Time to start my journey of inspiration and to get round as many desks as I can between now and next week!

Wishing everyone a Happy WOYWW, enjoy!

Sending smiles and waves from Eastbourne! :)

Angela x
Angel Greetings

Wednesday, 22 April 2015

What's On Your Workdesk Wednesday 307

Hello fellow deskers and visitors, welcome to the What's On Your Workdesk Wednesday desk hop... for those unfamiliar with this blog adventure, please visit Julia Dunnit, our lovely host at http://www.stamping-ground.blogspot.co.uk/ and why not take a peek at some fabulous creative work spaces all listed there :)


I've been making progress with my decoupage photo frame project and have really enjoyed the papers and the process, albeit sticky!  First I painted the frame with a coat of white gesso, then I used PVA glue to attach the papers.  I sealed the frame with a coat of Decoupatch Ultra Matt Finish varnish.

Once everything had dried I die-cut a photo of my brother and his partner (the gift recipients) and attached this to the photo frame.   I selected the stamp pictures to represent some of the countries they've visited :)
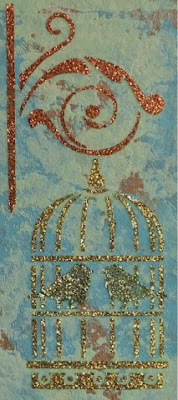
I turned over to simply paint the reverse but couldn't leave it plain and simple, oh no!  Why not have a double-sided picture?!...So, I got carried away with Imagination Craft Chalkies paints (Agean and Soft Sage), Sparkle Medium glitter pastes (Sage Green, Gold Shine and Light Copper) and the birdcage stencil...

Having added drops of blending solution to the paints, I applied them using a brayer and brush and impatiently waited for it to dry - which thankfully wasn't long!  I used the purple low tack masking tape to secure the stencil and carefully spread over the pastes using a palette knife.  Et voilà!
Here's a close up, the glitter paste really sparkles:


Thank you for popping by :) and thanks for any messages - they make my day! :)


Wishing everyone a cheerful, sunny and happy WOYWW!!


Remember to Keep Calm and Craft!...


Angela x
Angel Greetings


Tuesday, 14 April 2015

What's On Your Workdesk Wednesday 306

A sunny hello to all :)

Desk-hopping day has arrived!  Pop over to Julia Dunnit's blog to discover more about WOYWW and have a glimpse into the intriguing desk spaces of all these creative people http://stamping-ground.blogspot.co.uk/ You can also reach there by clicking on my WOYWW badge just to the right and down a bit ->

So here's my desk view today:


 To the left is a decoupage project I'm looking forward to starting, I'll be covering the Papier-mâché photo frame with the colourful postage stamps themed decoupage papers.  I'll be applying a coat of the white gesso paint (sitting above it in the pic) before layering and glueing torn pieces of the papers.  It's a present :) (Overdue!) 
 Next to the gesso pots you might be able to just make out a set of Inkadinks sprays that I am yet to play with.  They are there to remind me to try them out!
 In the centre are some stamped images (Strawberry Kisses, Crafter's Companion, 'Together Forever') that I've been colouring in for one of my course units for a Certificate in Paper Craft.  I gave the Spectrum pens another try...but alas, still not quite mastering the technique!..Am finding colouring with pencils and water much more my thing!
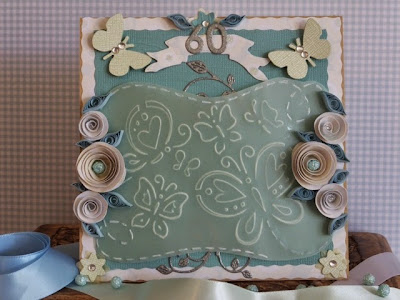
 Above this you can see a pile of remnants from making this birthday card:

 On the far right is my close companion-my Ipad!  Next to that, my diary, pencils and the latest Craftseller magazine to enjoy with a cuppa :)
 At the back of my desk is my ever faithful Grand Calibur residing in its permanent spot.

So, lots to keep me busy!

Time to go visiting fabulous desks, looking forward to an inspirational journey!

Thank you for viewing my craft paradise and many thanks for any comments that may be left :) :) :)

Bye for now,

Angela xx
Angelgreetings

Wednesday, 8 April 2015

What's On Your Workdesk Wednesday 305

Hi everyone :) wow is it really Wednesday already?!..time for some fun desk hopping with What's On Your Workdesk Wednesday, see Julia Dunnit's blog to find out more http://stamping-ground.blogspot.co.uk/ or click on the WOYWW badge to the right ->

The sun is shining gloriously into my craft room today and I'm loving that I can craft for longer now the evenings are lighter for longer :) Love Spring!
I've been having fun with my new craft goodies and tried my hand at zentangling the Dreamweaver Angel stencil:
Having taped the stencil down, I used a pencil to draw the stencil and then removed the stencil and went over it with a black fineliner pen.  I did it this way to protect my pen nibs (Sakura Pigma Micron-well worth the price!)  You can rub out the pencil lines.  Then I started doodling away...needless to say I used my magnifying lamp to see what I was doing!

Then I created a background using an 8" x 8" Kraft card for my base and built up the layers...

Following many button and ribbon options(!) I finally settled on this:
Flowers are Papermania Big Bloomers Bexley Black. The button, ribbons, twine and daisy embossed paper are all from Hobbycraft.

My cats are prowling around me, how do they know when it's feeding time?!..like clockwork!  Must tear myself away from my desk and pay them some attention!

Thank you for dropping by and for leaving a comment-they make my day! It's great to feel part of a community of like-minded crafters!  Speaking of which, I'm off for a nosey round the desks for some marvellous inspiration :)

Til next time, Happy WOYWW people!

Angela xx
Angelgreetings

Wednesday, 1 April 2015

What's On Your Workdesk Wednesday 304

Good day to all :) It's time for some desk hopping inspiration, take a look at Julia Dunnit's fabulous blog for enlightenment on this fun opportunity to share our work desks: http://stamping-ground.blogspot.co.uk or click on the WOYWW badge on the right...

Here's a picture of my desk crammed with crafting happiness from a hugely exciting (and expensive!) 'make it' craft exhibition:
To say I was in craft heaven is a great understatement! So much to play with as you can see!  

Working from the left are a range of paper mache photo frames, Crafter's Companion Distress Texture folder, Papermania flowers, Candi embellishments, beautiful papers, a selection of Imagination Crafts stencil templates, several pots of gorgeous Sparkle Medium pastes and chalk paints, blending solution, key brads, Inkadinks Summer Garden spray inks, a Dreamweaver Angel stencil, black satin card, cut and dry foam, purple low tack tape, a brayer, glue, football embellishments and butterfly charms and I also came away with bags of enthusiasm to learn new techniques!

Next time I'll share some of my experimenting with these glorious goodies!

Thanks so much for dropping by and for any comments, they're very appreciated :)

I'm off to enjoy looking at those creative workdesks where the magic happens! Thanks to Julia for hosting :)

Happy days crafters :)

Angela xx

Wednesday, 31 December 2014

My favourite makes of 2014

It's been an enjoyable year's crafting for me.  Here's some of my favourite creations that I thought I'd share with you :)

This birthday card above was my first attempt at quilling and parchment craft. 

loved making this card for my niece Livvy's 11th birthday.  Like me, she adores owls.  


This twisted easel, 3D decoupage card was a joy to put together.  The page extract is taken from the actual scene of the story.  I was delighted to find the Queen of Hearts ribbon.


For this project I used some acetate to attach the hot air balloon so it had some movement.  I folded a strip of acetate and glued it under the background paper and to the back of the hot air balloon.


I was delighted to discover Santoro London papers and embellishments this year. Their range of crafting goodies are beautiful.  Perfect for my butterfly obsession!
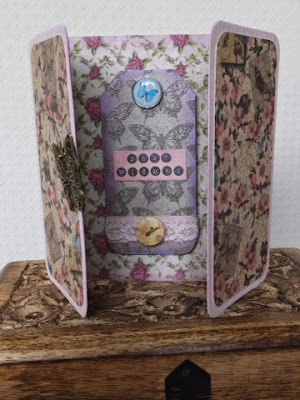
I made this gate-fold card for my great aunt's birthday.


This baby owl birthday card was great fun to make using a variety of textures.  I loved the bright colours.

Life's a beach :) I enjoy playing with handmade paper and teasing out the threads. I just dab some water around the edges using a paintbrush and gently tear to create this effect.  

I gave this card to my wife on her birthday. The quote is taken from Teresa Collins 'stationery noted' paper.  There are some wonderful quotes on the sheet; I like 'Do not let anyone ever dull your sparkle'


This is a picture of my desk a few weeks ago when I was busily preparing cards for a local charity called Care for the Carers in Eastbourne. 

This particular quote has been of great inspiration for me this year.  
The full saying is:“The clock is running. Make the most of today. Time waits for no man. Yesterday is history. Tomorrow is a mystery. Today is a gift. That's why it is called the present.” -Alice Morse Earle


This altered art project was challenging but I was very pleased with the results. Thanks and credit to Mark Gould http://speshink.blogspot.co.uk for the inspiring course at That Craft Place and help in making this. The Tic Tac Toe box is from Tando-Creative.  I used DecoArt acrylic paints and sandpaper.

I've really enjoyed playing with these papers and have made several cards.  The papers were free with Papercrafter magazine.  I made this card for a friend's birthday.  I used a thin paintbrush handle to roll the papers and secured with strong adhesive tape.

I have found the Tim Holtz Idea-ology 'Lost and Found' papers to be great for mens birthday cards.

Thank you for taking the time to look at my post.
Here's to a fabulously creative Happy New Year!!
Angela x